Having a homelab shouldn’t revolve around installing ESXi; it should be about what you do on top of it.
Installing ESXi should be painless, automated, and trivial.
I’ll cover how to create a bootable USB that will install ESXi unattended. The USB will auto-install onto itself, making it the boot disk afterward.
Unlike a local disk or SAN LUN, USB/SD devices are sensitive to excessive amounts of I/O as they tend to wear over time. The I/O wear naturally raises a concern about the life span of the USB/SD device. When booting from USB/SD, after ESXi is running, the OS runs from memory and there is very little ongoing I/O to the boot device. The only reoccurring I/O is when the host configuration is saved to disk, which by default is once every 10 minutes. Based on how often you reboot the host, it is expected that a good quality USB should last for several years. source
This is a repeatable process for fearless homelab ESXi installs while preserving any existing local VMFSs. If previous VMFSs exist, you can always clean them up after ESXi is running for a fresh slate.
Prerequisites
- ESXi server
- USB drive (reliability is more important than size over 1GB)
- Linux PC (like Ubuntu) with a USB port
Warning
The USB that you use to provision ESXi installs the OS onto itself. Meaning that after you prep the USB stick and plug it in, it will become your ESXi boot disk. Forever.
The target disk can be modified in the ks_cust.cfg at your own risk.
Get VMware ISOs
You can download a free 30-day trial of ESXi. However, I’ll be using my EVALExperience. For $180, EVALExperience provides one year of VMware licenses for personal use.
Using EVALExperience to download ISOs
There’s a detailed walkthrough at tinkertry.com. After signing up for EVALExperience, proceed.
- Login to vmug.onthehub.com
- Find VMware vCloud Suite Standard 7
- Click Add To Cart and Checkout
- Save the two keys:
VMware vCloud Suite Standard 7 (English) - Download
Activation Code: XXXXX-XXXXX-XXXXX-XXXXX-XXXXX
Serial Number: XXXXX-XXXXX-XXXXX-XXXXX-XXXXX
- Download ISOs for ESXi and vCenter
- VMware-VMvisor-Installer-6.7.0.update02-13006603.x86_64.iso
- VMware-VCSA-all-6.7.0-13010631.iso
Create a bootable USB
I’m using a Sandisk 8GB USB 3.0, but any similar drive should work.
Note
A USB port for formatting the drive is required. I suggest NOT using a VM to avoid USB passthrough problems.
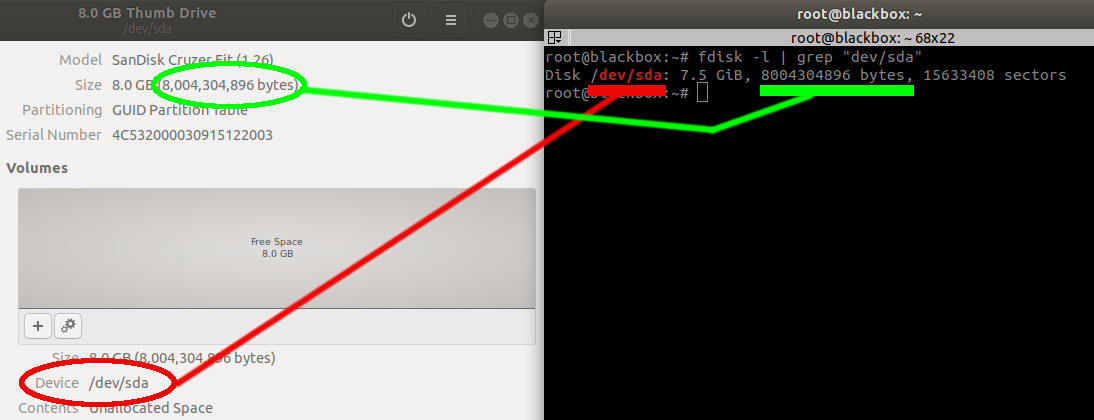
Identify the USB disk path
fdisk -l
This step may require root (sudo su -)
It helps to double-check the size from another source for comparison. Accuracy is crucial!

As you can see above, I will use /dev/sda as MY USB location; please validate YOUR USB location.
Make sure the USB device is unmounted.
umount /dev/sda # ignore if not mounted
Create a partition table
fdisk /dev/sda
-
Type
dto delete partitions until they are all deleted. -
Type
nto create primary partitionp.- Set to default
1that extends over the entire disk. - Take default sector ranges too.
- Set to default
-
Type
tto set the type to an appropriate setting for the FAT32 file systemc. -
Type
pto print the partition table.Disk /dev/sda: 7.5 GiB, 8004304896 bytes, 15633408 sectors Units: sectors of 1 * 512 = 512 bytes Sector size (logical/physical): 512 bytes / 512 bytes I/O size (minimum/optimal): 512 bytes / 512 bytes Disklabel type: dos Disk identifier: 0xb2521ac2 Device Boot Start End Sectors Size Id Type /dev/sda1 2048 15633407 15631360 7.5G c W95 FAT32 (LBA) -
Type
wto write the partition table and quit.
Format the USB (FAT32)
/sbin/mkfs.vfat -F 32 -n USB /dev/sda1
If you have issues, make sure the partition and volume are unmounted (
umount /dev/sda && unmount /dev/sda1)
Install the SYSLINUX bootloader
SYSLINUX is a suite of lightweight boot loaders. We’ll use it to prep the ESXi USB.
The locations of the syslinux executable file and the mbr.bin file might vary. If you are running Ubuntu, you most likely have it already.
Check if you have the syslinux executable
which syslinux

# expected: /usr/bin/syslinux
Check if you have the mbr.bin file by running the following one-liner.
[ -e "/usr/lib/syslinux/mbr/mbr.bin" ] && echo "file is present" || echo "file does not exist"

# expected: file is present
Proceed after validating the above conditions.
syslinux /dev/sda1
cat /usr/lib/syslinux/mbr/mbr.bin > /dev/sda
Mount the USB
mkdir /usbdisk
mount /dev/sda1 /usbdisk
Mount the ESXi ISO
mkdir /esxi_cdrom
mount -o loop VMware-VMvisor-Installer-6.7.0.update02-13006603.x86_64.iso /esxi_cdrom
Make sure to replace the ISO with the proper version (above).
Copy the ISO contents to the USB
cp -r /esxi_cdrom/* /usbdisk
Customize SYSLINUX
Rename isolinux.cfg to syslinux.cfg.
mv /usbdisk/isolinux.cfg /usbdisk/syslinux.cfg
In the syslinux.cfg file, edit the APPEND -c boot.cfg line to APPEND -c boot.cfg -p 1.
nano /usbdisk/syslinux.cfg
Create a ks_cust.cfg script
Start with my template and edit to taste.
curl -L -o ks_cust.cfg https://gist.githubusercontent.com/jimangel/5c54b35fa7a4d5791172ced3c08ea8d7/raw

# nano ks_cust.cfg
Alternately, copy/edit and paste the following template to ks_cust.cfg in your working directory.
For more ideas of what’s possible, see VMware’s documentation.
Copy ks_cust.cfg to the USB
cp ks_cust.cfg /usbdisk
Update boot.cfg
In the boot.cfg file, edit the kernelopt=runweasel line to kernelopt=ks=usb:/ks_cust.cfg.
nano /usbdisk/efi/boot/boot.cfg
After you’re complete, unmount the flash drive umount /usbdisk and the ISO umount /esxi_cdrom.
Boot the ESXi host
Insert the USB stick into the powered-down ESXi server and turn it on. You may need to configure your BIOS to boot from USB (or select it from a menu).
Once the USB drive loads, you will see it auto-configuring ESXi.
Warning
During the installation, it is ok for the server to reboot 1 or 2 times.
Validating install
- Find the IP of the ESXi host either via GUI or other methods.
- Navigate to
https://xxx.xxx.xxx.xxx/ui/#/loginand log in usingrootand your password set earlier (r00tp@ssw0rd).
Conclusion
At this point, modifying the ks scripts even further shouldn’t be a problem. You could also create duplicate copied USB sticks for booting multiple hosts.
